All posts in Tech posts

this category contains all blog posts

Fixing microphone issues on Windows 10 and RØDE NT-USB

Using a RØde NT-USN external microphone

scenario:  Microphone picks up sound, voice is pretty loud and clear, accoustic or electric guitar in the room is super faint. Using WIN10 laptop. Rode Drivers are 10.0.19041.3208

In this post i would like to lay out some troubleshooting steps I took when i had the recording issue.

I suggest before you troubleshoot any audio related issues to quit any software or apps that could be using and or manipulating sound settings. such as MS Teams, Webex, a zoom meeting, audacity etc. 

Check the rØde settings
I like the following settings on my MIC for recording:

Before I continue; the controls on the MIC iself, do NOT influence the gain of the microphone. The bottom button is the 

Level Control (Volume). This simply set the loudness of your headphones that you have plugged into your MIC. Remember you can use the rode MIC as an audio playback device as well, as long as you set that as your playback device in windows. I use this when recording guitar so i dont have to swap between headsets or having to take headset off when listening to external speakers when i playback my recording.  The top button is the 

Monitor Mix control.It lets you adjust the level of the mic v. the playback volume. So if you turn it completely clockwise, you will hear only playback sound, If you turn it all the way counter clockwise, you will hear only what the mic is picking up and no playback sound. This has NOTHING to do with MIC gain!! Mix control is actually a very usefull feature because it allows you to play back a song, sing or play over it listening to own sound over it and meanwhile recording only your playing or singing.
There are the rode connect and rode central software pack that you can use with the NT-USB, but i find them extremely useless and was not able to upgrade my MICs firmware. So that’s all i gotta say about that one.

Check recording device microphone level:

Right click on sound icon in bottom right of screen > open sound settings

go to your inout device, where you can verify the input level as per below;


If you see the sliding bar is not registering then obviously the ‘sensitivity’ level of the mic is too low (not enough gain). If the bar moves too much to the right, your sound will get capped, and it most likely means you have too much gain.

Changing the microphone level/increase gain

So this step is needed if you encounter low volume where microphone is not picking up sound or is picking up too much sound.

For this, see the previous picture and go to device properties of your rode mic. this will bring you into the following screen:

I would not cranck this up all the way buttweak it to personal taste.  I leave it at 70-80 because i find distortion sets in at anything higher than that. Although it is not stated as such i believe this is the gain, well could be volume as well, but this does change the sensitivity of the mic. What i suggest is to start the test and just only play guitar and check that the meter is not maxing out. you might need to go back and forth to tweak this volume setting.

I suggest using the built in Win 10 Voice recorder and see if the level is too high that it creates distortion. Sound recorder can be found searching at start menu for “voice recorder”

Run troubleshooter

At this point I am thinking this could be some sort of room ambient noise cancellation that suppresses anything but voice base audio

-Press Windows key + X
-Go to Settings
-Click Update and Security
-Click Troubleshooter then Additional troubleshooter.
-Look for Speech and run the troubleshooter.

choose “cortana cant hear me” then choose your MIC (as per below):

the troubleshooter will then notify that is has made changes to your MIC:

After i ran this,this seems to have fixed my issue.

if in your case this does not fix the issue, then here are some more troubleshooting steps.

Drivers might be an issue

It’s never a bad idea to use the latest drivers. so check and upgrade your MICs drivers if needed. -Press Windows key + X
-Go to Device Manager
-Expand the Sound and Video Game Controllers
-Select RODE NT-USB
-Right click and Update-Search automatically for drivers or browse if you already have them available on a file 
-Look for “Browse my computer for driver
-Let me pick drivers available drivers
-Choose an old driver and use it.

I had a quick search and it seems that Rode does not publish its own drivers on its website, and the drivers used for the NT-USB are microsoft signed and come into the operating system as a generic USB audio device. which is fine as long as it works, and this will make it part of your OS automated updates as well.

-Go to Control Panel
-In Control Panel, select Large icons from the View by drop down menu.
-Select Sound.
-Select the Recording tab
this will bring you into the screen below:

-Right click and hit Show Disabled Device
-Right click the Rode Microphone and click Enable (if not enabled)

-Right-click it again and select Set as Default Device.
-Right click Rode Microphone and click Properties.
-Click the Levels tab, then drag the volume slider towards the largest value.
-Click OK (I discussed the MIC level previously as well)
-Click Advance Tab
-Uncheck the box to “Allow application to take exclusive control on this device”.

This application exclusive control is a tricky one, because this same setting can be changed from the settings menu > sound > input > device properties as well. there seems to be some debate on how this setting should be used and what it does. in shared mode i.e. unticking the box othere apps can make changes to levels and volume etc. which might be undesired. Eitherway, its good to check it.

Microphone privacy

Turn on Microphone Privacy in each app.
Select Start > Settings > Privacy > Microphone

In Allow access to the microphone on this device, select Change and make sure Microphone access for this device is turned on. Then if necessary you can allow apps access to your microphone.
Once you’ve allowed microphone access to your apps, you can change the settings for each app.

Restart and check the Microphone.

If issue persist, let’s download the updated driver.
What is the exact model of your computer?

To check the system model proceed with these steps.
-Press Windows key + R
-Type msinfo32 and hit enter.
-Look for the System Model and manufacturer and post it here. For the Rode NT-USB, this information is not that exciting as its a generic USB audio device:

Somewhat beside the point, but i have also experienced cases wher playback only worked in certain apps and not in others, because the headset had restricted control. So this is something to also be mindful of

Goodluck and ciao

source:   https://answers.microsoft.com/en-us/windows/forum/all/rode-nt-usb-microphone-doesnt-work-with-windows-10/8a6c83be-b5dc-498c-887f-b0b744d9b309

Wireless security dot1x

“The more convenient it is to connect to a network, the less secure it is.”

In this post I will talk about wireless security why you would use dot1x in a corporate environment. I will also use Cisco ISE as part of the various solutions as the use case, but in reality I could have also used Aruba ClearPass as the central authentication solution. I will start off by summarizing all the authentication option in a nutshell before I dive deeper into the intricacies of dot1x.

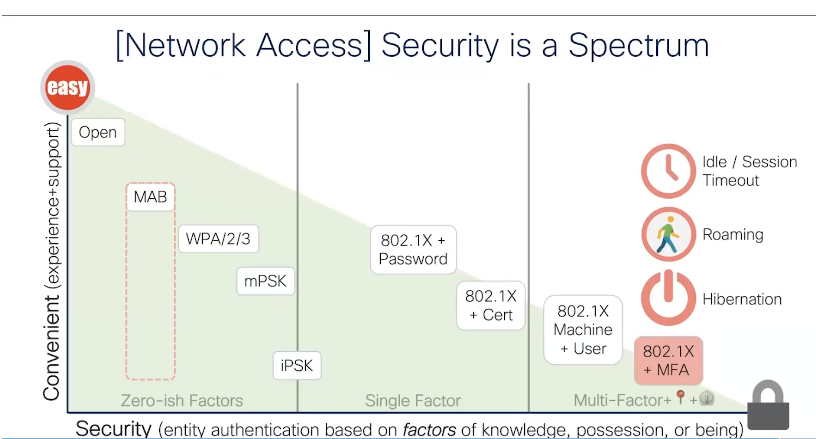
There are many ways in which you can implement wireless security. Typically there is a correlation between the level of security and the convenience in the way you connect. So the trade off here is that the easier it is to connect, the less secure it will be. I have added the picture below to present the various methods of connecting against convenience v. security.

Wireless security dot1x
Wireless security v convenience

So where does this leave us with what authetication option to use for what device? Authentication is important to understand because it basically allows for network administrators to dictate who can connect to your network. Of course based on the trust level of the endpoint we also need to be able to have some infuence on what the endpoint can connect to. For this post I do not want to go too much into the authorization part of Dot1X.

Summary of authentication types

Let us first jump into what authentication types are available and what type has the most common use case. Fter that I will expand a bit more on each of these types. The picture below shows the mostly used authentication options for each device or endpoint:

wireless authentictaion options
Wireless authentication options

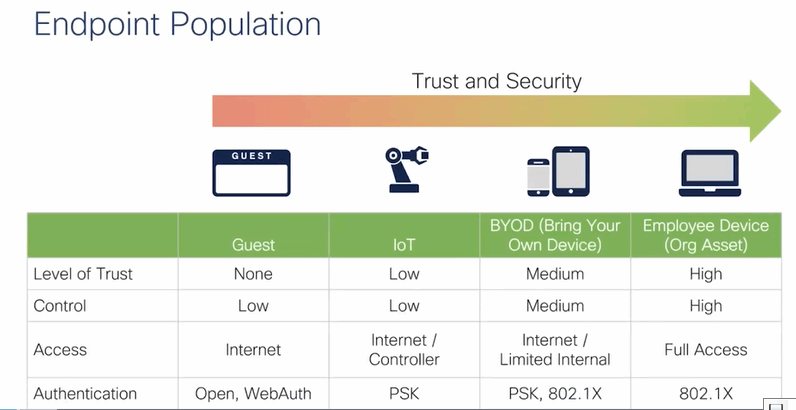
Each of these authentication types have have place and utility. And the picture above shows the most common authentication deployment types. The picture below shows as similar break down based on endpoint type and for what SSID you would typically use each method.

Authentication types, secure wireless dot1x
Authentication types

What you can see in this picture is that people would mainly use Dot1X as the authentication type to connect to a corporate network. Simply because it provides many option and because it offers the securest authentication and encryption of data.

Open Networks

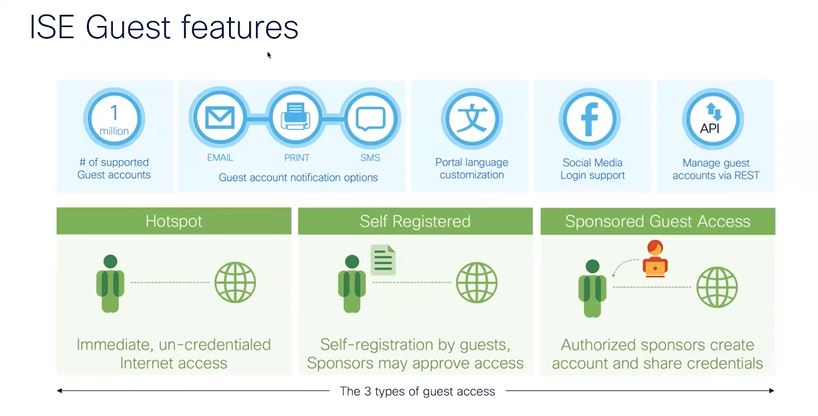
The most common use case for an open wireless network, is guest access, Guest access can come in the shapes of hotspot, self registered or sponsored guest access.

OPen networks, guest wireless access
Open Network, Guest Access and sponsored access are the three flav ours when it comes to guest access. All these three types have in common the fact that there really is not authentication requirement. Sure, you can argue that the guest might need to comply with a fair use policy or fill out some form with an email address, but one acnnot consider this as a from of authentication.

Pre shared keys (PSK)

Using PSK as the authentication method for wireless security is mainly for home users. It can be as simple as putting it on a fridge magnet so your friends can get onto your network. I know i am oversimplifying it slightly, but it is generally not used in corporate environment and should not be for good reasons. Not in the last reason for its lack of scalability.

MAC Authentication Bypass (MAB)

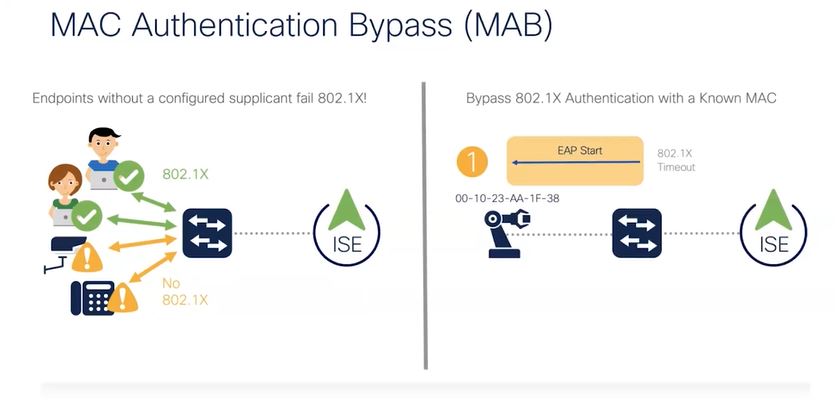
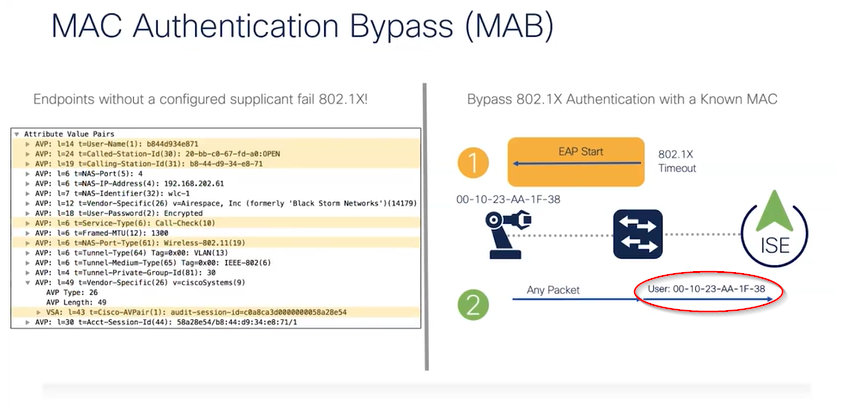
You would use MAB primarily for devices that do not do Dot1x. Either these devices are incapable or we just do not bother to configure the dot1x supplicant on them. So the simplest way to identify those devices is to use their MAC address. Because MAC addresses are per definition unique, however a man in the middle can spoof this.

MAC authentication bypass (MAB), wireless ecurity dot1x
MAC authentication bypass (MAB)

A lot of time you see administrators use MAB for cameras, phones (although you could use certificate based authentication), printers etc. You can use MAB for both wired and wireless authentication. Obviously when a none dot1x device connects to your dotx secured network, EAP (which is part of the dot1x framework) will time out. By this time the MAC address of the endpoint is already known, because of the endpoints DHCP requests for instance.

MAC authentication bypass
MAC authentication bypass (MAB)

The wireless LAN controller can then present the MAC address of the endpoint onto ISE to make an evaluation based in its Policy sets. As a consequence ISE can then allow the endpoint to connect by sending a RADIUS ACCEPT back to the AP.

Wireless Security dot1x options

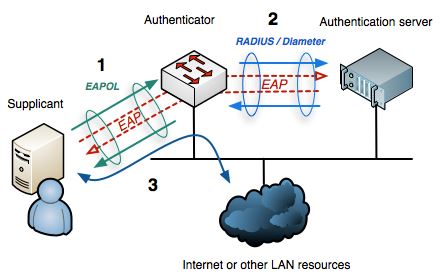
So this is where things get interesting and more complicated. IEEE 802.1X (dot1X), is a standard that describes the encapsulation of Extensible Authentication Protocol (EAP). This protocol runs both on wireless and wired networks. Dot1X authentication involves three parties: a supplicant, an authenticator, and an authentication server. The picture below show the mechanism behind dot1X.

IEE 802.3X, Dot1X, wireless security dot1x,  diagram
IEEE802.1X

The authenticator in the picture can be an AP in wireless deployment and the authentication server can be something like Cisco ISE. As you can see EAP is at the heart of all this. There are literally dozens of EAP methods available and most APs and Authentication servers support a majority of those. The table below shows a summary of the most popular ones, with their pros and cons.

EAP methods, Wireless secure dot1x
EAP Methods summary (source: https://www.intel.com/content/www/us/en/support/articles/000006999/wireless/legacy-intel-wireless-products.html )

If you use Cisco ISE you can set up your policy sets in such a way that you allow only certain EAP methods. ISE will actually let you turn off certain methods if you want, perhaps because they are not considered being secure enough. Either way, choosing a method depends on a large number of parameters.

A review of the above table usually provides the following conclusions:

  • MD5 isn’t typically used as it only does a one-way authentication, and perhaps even more importantly doesn’t support automatic distribution and rotation of WEP keys so does nothing to relieve the administrative burden of manual WEP key maintenance.
  • TLS, while very secure, requires client certificates to be installed on each Wi-Fi workstation. Maintenance of a PKI infrastructure requires additional administrative expertise and time in addition to that of maintaining the WLAN itself.
  • TTLS addresses the certificate issue by tunneling TLS, and thus eliminating the need for a certificate on the client side. Making this an often preferred option. Funk Software* is the primary promoter of TTLS, and there’s a charge for supplicant and authentication server software.
  • LEAP has the longest history, and while previously Cisco proprietary (works with Cisco Wi-Fi adapters only), Cisco has licensed LEAP to a variety of other manufacturers through their Cisco Compatible Extensions program. A strong password policy should be enforced when LEAP is used for authentication.
  • EAP-FAST is now available for enterprises that can’t enforce a strong password policy and don’t want to deploy certificates for authentication.
  • The more recent PEAP works similar to EAP-TTLS in that it doesn’t require a certificate on the client side. PEAP is backed by Cisco and Microsoft and is available at no additional cost from Microsoft. If desired to transition from LEAP to PEAP, Cisco’s ISE authentication server will run both

The next thing I will do is expand on the various EAP methods. I will explain how they work, how to configure them based on a use case.

ISE Policy Set for IEE 802.1X on wireless

Cisco ISE provides a lot of features such as compliance, BYOD, guest wireless, Trustsec, TACACS and wired & wireless access.  This post will describe the basic configuration for wireless authentication and authorization using IEEE 802.1X. This post is mainly based ISE version 3.1. The post will focus on the ISE policy set.

Dot1x hinges on the use of RADIUS. When a wireless clients tries to connect to a wireless network, the access point will communicate to ISE (using its RADIUS server IP addresses). This RADIUS communcation wil achive two things; authentication and authorization. If the authentication is successful, ISE will respond back to the AP with a successfull authorization after which the client can connect to the wireless network.

From an ISE perspective Policy sets are where ISE does its the authentication and authorization descision making. So the authentication part of this process decides IF a user can connect to the network and the authorization part dictates WHAT the user can access.

Prerequisites to configuring policy sets

Before I go into detail on policy sets, you would need to configure a number of items first. The most important ones are: external identity stores and network devices.

First you will need to add all your network devices that will communicate to ISE for authentication/authorization. This does not only include RADIUS, but also TACACS. This is where the IP address of the network device is set (this is the source IP address for all RADIUS communications from the network device to the ISE server (PSN) this IP address needs to be identical.

Administration > Network resources > Network Devices

If you are going to configure policies that are using AD groups as a way to authenticate users, you will also need to add an external identity source a.k.a. Join Point, as you can see below.

Administration > Identity Management > External Identity Sources

prerequisite for configuring ISE policy set

You can get more granular and only make certain AD groups available by going into groups and add/delete groups.  These groups will later become available when configuring your authentication policies

ISE policy set prerequisite

I do not want ot go into further detail on how to integrate AD with ISE and uploading certificates etc. because this post is aimed at the workings of policy sets. I merely want to point out that setting up join points are a prerequisite for configuring policy sets that use AD.

OK so Back to policy sets, the following picture shows the scenario what we are going to configure:

ISE policy set configuration scenario

For this on your Wireless LAN controller, you will need to configure AAA methods pointing to your ISE servers so that each WLAN that requires Dot1X points to ISE for authentication and authorization purposes.(as per below)

ISE policy set prerequisite

Assign the method to your WLAN (in this demo case, we will use 1 WLAN with a PSK and one WLAN with dot1x).

ISE policy set prerequisite

You will need to use AAA override on your WLC configuration to allow ISE to stipulate VLAN assignements and dACLs. You can find a detailed description on AAA override at:

https://www.cisco.com/c/en/us/td/docs/wireless/controller/7-4/configuration/guides/consolidated/b_cg74_CONSOLIDATED/m_configuring_aaa_override.pdf

Again, I do not want to spend to much time on detailing on how you need to configure the WLC because that is not what this post is about.

Configuring Policy Sets

Once you have configured your WLC, you can then set up your AD integration in ISE and have added your network devices into ISE, you are ready to start putting together your ISE Policy set.

There are 3 main components to a policy set:

  1. Policy set condition
  2. Authentication policy
  3. Authorization policy

ISE evaluates these components sequentially.


1. ISE Policy set conditions

ISE policy set s work similar to access-lists; the are evaluated top down. If the condition is met, it will not continue down the line. Policy sets are in essence collections of authorization (AuthZ) and authentication (AuthC) rules. If there is any overlap in conditions, you should order the more granular/specific condition to the top.  

Also it is important to understand, that if a condition is met and the authentication for that policy set is unsuccessfull, it does not move on to the next policy set in the list. 

The picture below show the basics of the policy set conditions and allowed protocols.

ISE policy set and conditions

The allowed protocols are usually left to Default, This means all protocols, that are turned on, are allowed. You can create additional allowed protocol lists, to force only a certain protocols.

The picture below shows a list that only allows EAP-TLS.

U can then use this exclusive list as your allowed protocols.

For our demo scenario we have 2 SSIDs. One uses dot1X and one uses PSK. This means that we need two policy sets; one that meets the C9800-dot1x SSID and one that meets the C9800-PSK SSID.

ISE policy set using radius attribute of called station
Policy set condition using Called-Station attribute

To achive this, you can use the called station-ID and the SSID name as the condition set. 

2. Authentication policy

After we have created our ISE policy set condition, in step1, we will now need to authenticate the supplicants credentials. Remember step 1 only matches something wanting to authenticate dot1x with a called station ID of C9300-DOT1X. The authentication policy now defines how we are going to check the credentials. 

The authentication policy defines how users are authenticated against which source (STORE).

Basically the authentication policy sets a condition. After this condition is met the result defines the store against which authentication is checked. This store could be AD, internal identity store or Certificate Authentication Profile etc.


By default, when you create a new ISE Policy set, the authentication condition is populated with the default value. This will use all identity stores as its source:

Defaukt authentication policy

Although leaving it to default will probably work, i think this is not a good habit. In our case we can set it to use AD as the source, because the authorization will  be checked against AD group membership. 

3.Authorization policy

Authorization deals with the WHAT of the RADIUS transactions. What can the user/endpoint access AFTER its successful authentication. The picture below shows this:

A condition is met the result kicks in. The result is defined in the authorization profile. The authorization profile can contain for example a VLAN assignment or a downloadable ACL (dACL). As a result you would like to configure your results first, before you configure your policy sets.  Our scenario needs a distinction between contractors and employees, once they try to connect to the C9300-DOT1X SSID, as per below:

The condition here, is that contractors are part of the Users/Contractors AD group and Employees are member of Users/Domain Users Group. Based on this group member ship an authorization policy is applied. To configure a result got to Administration > Policy > Policy elements > Result > Authorization > autorization Profile/dACL

So for the IoT profile you could create a profile with the following dACL (allowing only internet traffic):

ISE dynamic ACL
dynamic ACL

We can can now define this dACL inside the IoT authorization profile. Ofcourse the Access Type in your profile would have to be ACCESS-ACCEPT.

Authorization profile
ISE Authorization Profile

What this actually means is that within a certain single policy set you can have multiple authorization conditions. In our case, we want role base access on the same SSID. In order not treat contractors and employees equally in terms of access.

I have to add that this post describes just ONE method to meet the use case scenario. There are plenty more ways to achieve the same objective. In general ISE policies come down to the creativity of the engineer . There simply is no one size fits all.

Because I am on a journey to learn more about ISE, no doubt i will do more posts on ISE policy set.

Namaste!

SIP three way handshakes

Time for another post on SIP, why SIP?  Because SIP is good, SIP is like a nice dessert, it is something that just works. This time I want to touch on some of its basic fundamentals; the three way handshake. I decided on this topic because recently I have been working on a number of issues that had to do with incomplete SIP messaging between endpoints and calls that were being cut off after about 30 to 40 seconds. Now, when you come across calls that disconnect after a certain and set period time and time again, you can bet money on it, that some timer has expired forcing the call to drop.

So let me brush up some basics regarding SIP call establishment. SIP Sessions are used with Voice and Video over IP, to establish a call session between users. The core SIP specification provides a way to set up and manage sessions between two user agents (i.e. endpoints, such as desk phones, or software SIP clients).

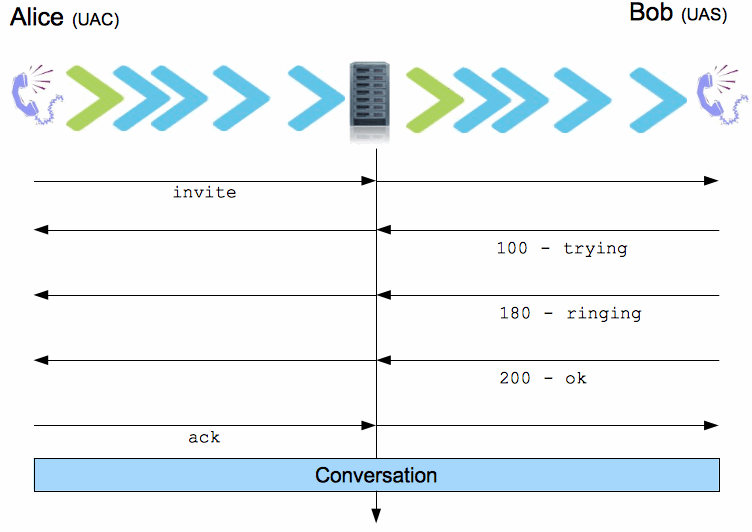
SIP sessions, sometimes referred to informally as “calls” and more formally referred to as dialogs, are created via invitations from one User Agent (User Agent Client or UAC) to another (User Agent Server or UAS). This invitation transaction is basically a three-way handshake between the UAC and UAS that consists of the initial INVITE message sent by the UAC to the UAS, one or more provisional responses sent by the UAS to the UAC, a final response sent by the UAS to the UAC, and an acknowledgment sent by the UAC to the UAS.

The three way handshake (similar to a TCP three way handshake) in SIP works as follows INVITE  –response (1xx)  – ACK. So as soon as the INVITE is sent to request a dialog  (Alice in the example picture above), Bob sends a 100 TRYING status update back, so UA1 does not re-transmit its INVITE. The 180 RINGING is sent back to Alice to signify that the phone is ringing. The 200 OK is sent from the called party as soon as Bob picks up the phone (in this cased the OK also contains the SDP). After this the ACK is send by the caller. Remember the ACK is always sent by the party that sent the initial INVITE. This ACK as part of the 3 way handshake is important because with this ACK the caller confirms back to the called party that it has received a final response to an INVITE Request. All these messages within the three way handshake will have the same Cseq # in their message header.

So, in  a nutshell, the 3 way SIP handshake is:

  • The caller sends an INVITE
  • The callee sends an 200 OK to accept the call
  • The caller sends an ACK to indicate that the handshake is done and a call is going to be setup

I you want more in depth documentation on SIP, i suggest you read  RFC 3261